
GPG署名付きcommitをGitHubにpushする
GitHubにGPG署名済みcommitをpushし、commit一覧にて”Verified”と表示する方法を調べたので自分用にメモ。
どういうこと?
GitHub上でmergeしたりすると、そのmerge commitに”Verified”とついており、どうやったら自分のcommitでも付けられるか気になったので調べました。こんな感じになります。
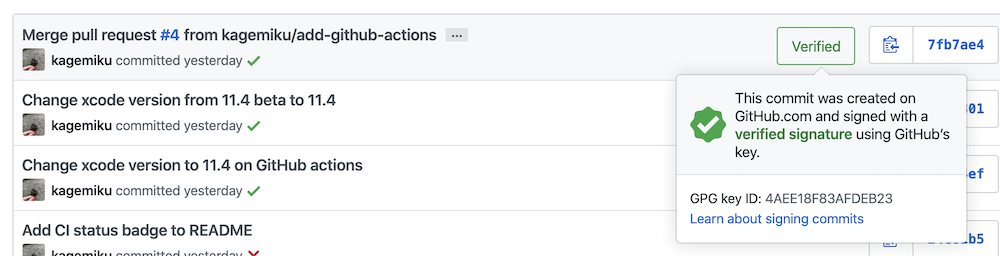
GPG commit example
カッコいいんですが、色々調べてるうちにLinusさん的には全commitではなく、tagにsigningすることを推奨しているようですね。まあ確かに。
手順
大きく次の手順になります。 1. GPG keyの生成とGitHubへの登録 2. Localでcommitを署名しpush
1. GPG keyの生成とGitHubへの登録
基本的にはGitHub公式のヘルプに従って進めていきます。
初めに、gpgコマンドをインストールします。自分はbrewでインストールしました。
$ brew install gpgその後は基本的に公式手順通りです。
$ gpg --full-generate-key
gpg (GnuPG) 2.2.20; Copyright (C) 2020 Free Software Foundation, Inc.
This is free software: you are free to change and redistribute it.
There is NO WARRANTY, to the extent permitted by law.

gpg: directory '/Users/user/.gnupg' created
gpg: keybox '/Users/user/.gnupg/pubring.kbx' created
Please select what kind of key you want:
   (1) RSA and RSA (default)
   (2) DSA and Elgamal
   (3) DSA (sign only)
   (4) RSA (sign only)
  (14) Existing key from card
Your selection? 1                       # <- 1がデフォルト
RSA keys may be between 1024 and 4096 bits long.
What keysize do you want? (2048) 4096   # <- GitHubのドキュメントには最低4096bit必要と書いてある
Requested keysize is 4096 bits
Please specify how long the key should be valid.
         0 = key does not expire
      <n>  = key expires in n days
      <n>w = key expires in n weeks
      <n>m = key expires in n months
      <n>y = key expires in n years
Key is valid for? (0) 0                 # <- 期限なしでもよさそう
Is this correct? (y/N) y

GnuPG needs to construct a user ID to identify your key.

Real name: Your Name
Email address: your@mail.address
Comment:                                # <- commentは空でもok
You selected this USER-ID:
    "Your Name <your@mail.address>"

Change (N)ame, (C)omment, (E)mail or (O)kay/(Q)uit? O
ここまで進めると、パスフレーズ入力を求められる。
   ┌──────────────────────────────────────────────────────┐
   │ Please enter the passphrase to                       │
   │ protect your new key                                 │
   │                                                      │
   │ Passphrase: ________________________________________ │
   │                                                      │
   │       <OK>                              <Cancel>     │
   └──────────────────────────────────────────────────────┘
確認のためもう一度パスフレーズを入力すると、key生成が始まる。
We need to generate a lot of random bytes. It is a good idea to perform
some other action (type on the keyboard, move the mouse, utilize the
disks) during the prime generation; this gives the random number
generator a better chance to gain enough entropy.
We need to generate a lot of random bytes. It is a good idea to perform
some other action (type on the keyboard, move the mouse, utilize the
disks) during the prime generation; this gives the random number
generator a better chance to gain enough entropy.
gpg: /Users/user/.gnupg/trustdb.gpg: trustdb created
gpg: key YOURKEYID marked as ultimately trusted
gpg: directory '/Users/user/.gnupg/openpgp-revocs.d' created
gpg: revocation certificate stored as '/Users/user/.gnupg/openpgp-revocs.d/HOGEHOGEHOGEHOGEHOGEHOGE.rev'
public and secret key created and signed.

pub   rsa4096 2020-03-30 [SC]
      HOGEHOGEHOGEHOGEHOGEHOGEHOGEHOGE
uid                      Your Name <your@mail.address>
sub   rsa4096 2020-03-30 [E]
生成が完了した後、Key IDを取得します。
$ gpg --list-secret-keys --keyid-format LONG
gpg: checking the trustdb
gpg: marginals needed: 3  completes needed: 1  trust model: pgp
gpg: depth: 0  valid:   1  signed:   0  trust: 0-, 0q, 0n, 0m, 0f, 1u
/Users/user/.gnupg/pubring.kbx
-------------------------------
sec   rsa4096/YOURKEYID 2020-03-30 [SC]
      HOGEHOGEHOGEHOGEHOGEHOGE
uid                 [ultimate] Your Name <your@mail.address>
ssb   rsa4096/FUGAFUGAFUGA 2020-03-30 [E]
sec rsa4096/YOURKEYID 2020-03-30 [SC] これのYOURKEYID の箇所がKey IDになります。
このKey IDを指定して、公開鍵の内容をコピーし、GitHubのSettings -> SSH and GPG keysでNew GPG keyして貼り付けます。
$ gpg --armor --export YOURKEYID
-----BEGIN PGP PUBLIC KEY BLOCK-----
...
...
...
-----END PGP PUBLIC KEY BLOCK-----
2. Localでcommitを署名しpush
次に実際にcommitを署名してpushしてみます。こちらも基本的にはGitHubの公式ヘルプの通りです。
まずは.gitconfigファイルにGPG keyの情報を書き込みます。
$ git config --global user.signingkey YOURKEYID
$ git config --global gpg.program gpg
次に環境変数を設定します。これは適宜使ってるshのconfigに加えてください。
export GPG_TTY=$(tty)
後は、commitする際に次のように-Sオプションを加えると、(必要に応じて)パスフレーズ入力を求められ、成功するとcommitに署名できます。そのままpushすると、記事冒頭のように”Verified”バッジが付きます。
$ git commit -S -m "Commit message"
$ git push
他のPCに公開鍵・秘密鍵をコピーする
複数PCを所有している場合、基本的にはPCごとに別々の鍵ペアを生成するほうが安全かとは思いますが、先程作った鍵ペアを別のPCのgpgに取り込ませることもできます。
$ gpg --export-secret-keys --armor > gpg-private.keys.backup
$ gpg --export --armor > gpg-public.keys.backup
これらのファイルを別のPCに移した後、その別のPC上で次を実行します。
$ gpg --import gpg-private.keys.backup
$ gpg --import gpg-public.keys.backup
これで複数のPCで共通の鍵ペアを使えるようになります。
